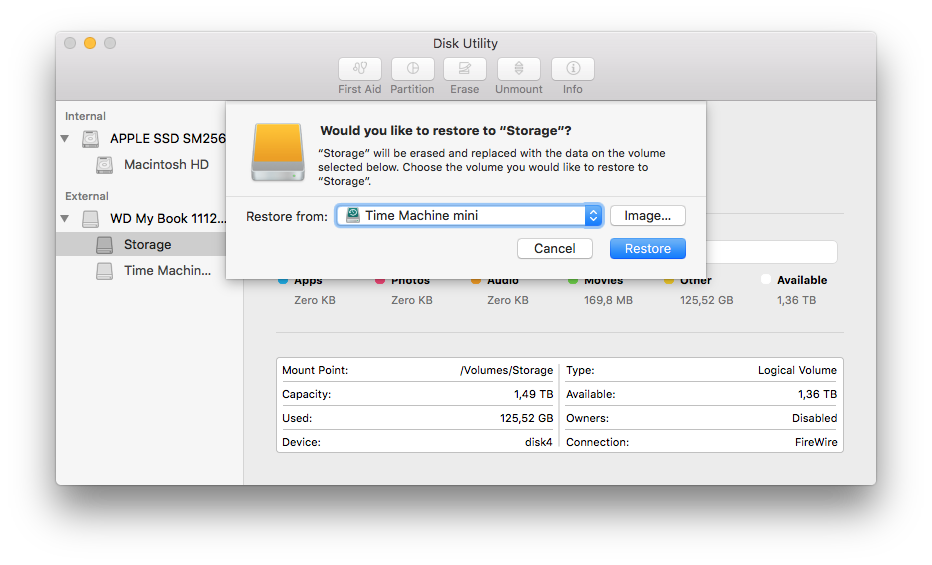
To move your Time Machine backup to another disk, use Disk Utility
Update July 12th 2018
A reader let me know that since macOS 10.13.4 (at least) Finder’s copy behavior has changed and will respect hard links. This means that the backup will no longer dramatically increase in size. It will still take hours “Preparing to Copy”, though.
I’ve not tested this, and until I do my recommended way of copying a Time Machine backup is still using Disk Utility. If you’re feeling adventurous however (and have a bunch of time to spare), you might want to give Finder a go first.
Time Machine is a great way to store incremental backups of your Mac. It’s pretty efficient too, using only a relatively small amount of disk space. Still, there are reasons to switch your Time Machine backup to another drive. Maybe your disk is showing signs of failure, or it’s simply running out of space. Moving your backup is not as easy as it seems though.
I have several backup disks and was using them rather inefficiently, that’s why I wanted to move my Time Machine partition to a new disk. After trying several ways to make this happen, I’ve come to the conclusion that using Disk Utility is the only reliable method. But first, let’s go over every method I’ve tried that didn’t work:
Finder (takes a long time, increases size)
Apple actually recommends using Finder to move or copy a Time Machine backup, by simply dragging the Backups.backupdb to another drive. These are the steps they tell you to take:
- Check the format of your new backup drive.
- Set permissions on your new backup drive.
- Temporarily turn Time Machine off.
- Copy your backup data from your original drive to your new drive.
- Set Time Machine to use your new drive.
Things will go differently than you might expect on step 4 though. First, it’ll take many hours before Finder actually starts copying; it spends this time preparing to copy. And while it’s copying you’ll notice that the copy will grow a lot bigger than the original backup.
Terminal commands (increases size)
- Open a Terminal window (
/Applications/Utilities/Terminal.app). - Type in the following command (without the $ sign and replace [Time Machine Disk] and [Destination Disk] with the relevant paths in your setup):
$ cp -a "/Volumes/[Time Machine Disk]" "/Volumes/[Destination Disk]"
This actually starts copying files straight away, but you’ll notice after a while that this method also increases the size of the copy several times over the original.
Funny story: I actually spent several hours copying files using cp -r instead of cp -a. The -a parameter takes into account symbolic links and such, while -r doesn’t. The backup would’ve been corrupted.
Always copy folders and packages using
cp -a.
– Me, after wasting several hours
Disk Utility
This comes with a few downsides, but it actually gives you an exact copy of the original data.
Downsides
- You can only copy from a disk or partition to another disk or partition.
- The destination partition needs to be at least the same size of the original, probably a little bigger.
- It’s a little more complicated than simply dragging the
Backup.backupdbfolder to a new disk.
Upsides
- Relatively quick.
- The copy is the exact same size as the original.
Currently, it’s the only way I know to reliably move a Time Machine backup to another disk. I don’t understand why Apple advertises using Finder instead of using this. Anyway, here’s how it works:
- Open Disk Utility (
/Applications/Utilities/Disk Utility.app). - Check the format of your new backup drive. It needs to be a GUID partition and formatted as Mac OS Extended (Journaled).
- Temporarily turn Time Machine off.
- In Disk Utility select the new backup drive.
- From the “Edit” menu item, select “Restore…”.
- In the menu that pops up select the original Time Machine drive.
- Wait…
- Set permissions on your new backup drive. Get Info on the new drive in Finder and make sure “Ignore ownership on this volume” at the bottom of the “Sharing & Permissions” section of the Get Info window is unchecked.
- Go into Time Machine and select your new drive to backup to.

And that’s it, you now have an exact copy of your Time Machine backup on another drive. 👌
I make apps, take a look 👇

Beautiful images of code
Generate gorgeous, highly customizable images from your code snippets. Ready to save or share.